Showing posts with label tools. Show all posts

Monday, December 06, 2010

Volatility 1.3 get_plugins Script Update

I've finally gotten around to updating the get_plugins script I wrote a while back for Volatility 1.3 (and finally gotten around to blogging about it). This is due to a few changes in plugins, dependencies and to address difficulties mentioned in lorgor's blog.

MHL has also updated malfind2 to work with Yara 1.4a, so this script is compatible with those changes.

I have only tested this on Ubuntu and Mac OSX (with MacPorts installed).

  1. You must run this script as root

  2. This script also installs Volatility using SVN. If you are running Ubuntu or Mac it will check that SVN is installed, and if not, will install it and pull down Volatility in the current directory.

  3. If you are running Ubuntu or Mac OSX, this script will install other dependencies you will need like pcregrep libpcre++-dev python-dev for Ubuntu or pcre pcre++ for Mac.

  4. This script installs dependencies: pefile, libdasm, pycrypto, yara-python 1.4a, as well as all known Volatility plugins, including the newer VAP ones from MHL


You still have to install Inline::Python on your own.

You can find the script in my GitHub repository or as raw text here

Saturday, August 14, 2010

Upated Volatility SQLite plugins

I have recently updated the Volatility sqlite3 plugins (for 1.3.2 branch) with some minor changes:

1) Removal of path from image name
2) Lowercase of all processes, dlls, filenames, modules etc

To make things even more interesting, I have converted some of the scanning code to output in sqlite3 as well:


tar -cvzf vol_sql-0.3.tgz vol_sql-0.3/
vol_sql-0.3/
vol_sql-0.3/connections_2.py
vol_sql-0.3/connscan2sql.py
vol_sql-0.3/dlllist_2.py
vol_sql-0.3/driverscan2sql.py
vol_sql-0.3/files_2.py
vol_sql-0.3/filescan2sql.py
vol_sql-0.3/getsids.py
vol_sql-0.3/modscan2sql.py
vol_sql-0.3/modules_2.py
vol_sql-0.3/pslist_2.py
vol_sql-0.3/psscan3sql.py
vol_sql-0.3/sockets_2.py
vol_sql-0.3/sockscan2sql.py


Schema:


CREATE TABLE connections (pid integer, local text, remote text, memimage text);

CREATE TABLE connscan2(pid integer, local text, remote text, memimage text);

CREATE TABLE dlls (pname text, pid integer, cmdline text, base text, size text, path text, memimage text);

CREATE TABLE driverscan2(paddr text, objtype text, pointers integer, handles integer, start text, size text, srvckey text, driver text, path text, memimage text);

CREATE TABLE files (pid integer, file text, num integer, memimage text);

CREATE TABLE filescan2(paddr text, objtype text, pointers integer, handles integer, access text, file text, memimage text);

CREATE TABLE modscan2 (file text, base text, size text, name text, memimage text);

CREATE TABLE modules (file text, base text, size text, name text, memimage text);

CREATE TABLE process (pname text, pid integer, ppid integer, thrds text, hndl text, ctime text, memimage text);

CREATE TABLE psscan3(pid integer, ppid integer, ctime text, etime text, offset text, pdb text, pname text, memimage text);

CREATE TABLE sids (pname text, pid integer, sid_string text, sid_name text, memimage text);

CREATE TABLE sockets (pid integer, port integer, proto text, ctime text, memimage text);

CREATE TABLE sockscan2(pid integer, port integer, proto text, ctime text, offset text, memimage text);


So what kinds of queries could we make with the output of these plugins? Here are few brief examples.

Suppose you want to focus on one pid:


select * from files where pid = [pid]
select * from connections where pid = [pid]


etc..

Suppose you want to link up connections output with the process information:


select process.pname, connections.* from connections
join process where process.pid = connections.pid
order by connections.pid;


Suppose you have information from more than one image in your database and want to see if there are any dlls/processes/files in one image not represented in the others:


select * from dlls
where path not in
(select path from dlls where memimage is not [image name])


Suppose you don't care about dlls with a certain path, like winsxs for example:


select * from dlls
where path not in
(select path from dlls
where memimage is not [image name]) and
path not like '%winsxs%';


Want to output all files in alphabetical order?


select * from files order by file;


or by PID?


select * from files order by pid;


Now that we have sqlite output for some of the scanning plugins we can quickly compare for information missing from regular plugins. Here's an example of pslist vs psscan3 on an image released by Moyix in his post releasing psscan3:


select psscan3.pid, psscan3.ppid, psscan3.ctime,
psscan3.pname from psscan3
where pid not in (select pid from process)
order by pid;

0|0||idle
592|360|Sat Nov 15 23:42:56 2008|csrss.exe
660|616|Sat Nov 15 23:42:56 2008|services.exe
828|660|Sat Nov 15 23:42:57 2008|svchost.exe
924|660|Sat Nov 15 23:42:57 2008|svchost.exe
992|660|Sat Nov 15 23:43:25 2008|alg.exe
1016|660|Sat Nov 15 23:42:57 2008|svchost.exe
1696|1516|Wed Nov 26 07:43:28 2008|network_listene


Well, I'm sure you can think up a lot more crazy queries as well...

The older sqlite plugins usage can be found here. The newly converted plugins usage is:


./volatility plugin -f [image] -d [sqlite db]


At some point I'll cover output rendering in the 1.4 branch, which is more interesting :-) Until then:

Happy hunting!

Sunday, February 14, 2010

GNB's Timeline EnScript

A former colleague of mine, Geoff Black, has a pretty cool timeline EnScript (zip file) available on his website. I have been playing around with it and have meant to blog about it for a while...

The contents of the zip are as follows:

Timeline Report.EnPack
Timeline Report.EnScript (actual code)
Timeline_Report_README.pdf
Timeline_Report_WHATSNEW.pdf
Include\GNB_HTMLlib.EnScript (library file)
Include\GNB_XMLlib.EnScript (library file)


I must say that it's nice that Geoff has given us the code to his Timeline script so that one can modify as desired. It's also nice that he includes README and WHATSNEW files so you can have something to reference for past and present versions.

Simply unzip these items (without the pdfs) into your EnCaseX\EnScript folder and you are ready to go. You can run the script by either double clicking the EnPack or the EnScript, just make sure to add a disk image to the case first ;-). When you run it you will see the following:


There are a lot of options you can choose. Here's a closeup of the interface itself:


You can pick a certain time period with a start and stop date for the timeline (boxed in blue). You can pick the type of output you want (boxed in pink), whether you want Records, Bookmarks, a Tab Delimited report (TSV), how many entries you'd like in each TSV file and whether or not you would like an HTML report better suited for IE or Firefox. There are more Script Options and Time Options (boxed in green) that allow you to select files you want in the timeline report (default is all files) and which time entries you are interested in seeing (default is all). You can modify the order to the Output Fields (boxed in red) for the TSV file or remove fields that are not of interest. Other fields are self explanatory.

While the script is running you can see the progress bar at the bottom right. If you choose the HTML report option you may end up with several HTML files (depending on how many files are selected and how many entries per file you have selected) and if this is the case each file is named in order for example:

TimelineReport-FF.html
TimelineReport-FF2.html
TimelineReport-FF3.html

and so on... You can see an example report below:


The latest change is highlighted, but you can see that some files might have the same time stamp for different fields. In this case the file will be listed twice, once with Created highlighted and once with Accessed highlighted (from the README).

You can check out some of Geoff's other EnScripts and CEIC presentations at his website: http://www.geoffblack.com/forensics.

Yahoo Messenger EnScripts

There are a couple of publicly available Yahoo Messenger EnScripts/EnPacks out, such as:

Yahoo Decoder in unallocated by Lance Mueller

YahooMessenger-Parser by Paul Bobby

Pretty useful scripts, however they don't handle right-to-left languages like Hebrew and Arabic. Here are some before pics from my test run with Hebrew:

Lance Mueller's script's output:


Paul Bobby's scripts' output:


As you can see, (well if you know what Hebrew letters are supposed to look like) the letters come out as some gobbeldy-gook. This is something I've been meaning to comment on for a while, having written various chat EnScripts at the beginning of my GSI employment. I have just gotten around to it now... The "encryption" method is the same for all unicode languages in that it is a byte-by-byte xor with the local username. The problem is that the encoding becomes distorted when it is just saved in a string. For example the letters ש and ל with UTF-8 encodings d7a9 and d79c respectively become c397 and c2a9 (it is left as an exercise for the reader to figure out why). So here comes a solution that I have used in the past.

The EnScripting language has a class called MemoryFileClass, which allows you to have in memory buffers that you can treat as files. You can create them, open them, read and write to them as you would any other file. So the idea is simple enough: write to a memory buffer as you decrypt the message and then extract the message after all decryption has taken place. This is accomplished by adding a couple of helper functions to Paul Bobby's code:

bool WriteBuffer(MemoryFileClass &file, char msg) {
file.SetCodePage(CodePageClass::ANSI);
int temp = msg;
file.WriteBinaryInt(temp, 1);
return file.IsValid();
}

void ReadBuffer(MemoryFileClass &file, String &msg) {
file.SetCodePage(CodePageClass::UTF8);
file.Seek(0);
file.ReadString(msg);
}


Now we can just call the functions as appropriate when decrypting and outputting the messages. You can see the correct output after this modification below (yeah, the conversation is lame and is just a test ;-):


The complete modified EnScript is available on the GSI forum (registration required):

A thread on the GSI forum with Paul Bobby's fixed EnScript

Monday, January 11, 2010

Volatility's Output Rendering Functions

Lately I've been playing around writing plugins for Volatility. A few of these will will be released at the end of this blog post, some others are still in the works to be released later. During the writing of some of the more complicated plugins, I decided that I needed to have some temporary storage while doing complex processing. Sure I could dump to a file and process that later, but why not do it within Volatility itself?

SQLite is good for this. There's an option to use an in-memory database (":memory:") that will remain in memory until the process dies. I also started thinking that some people might like to have a SQLite database of all the information they could get from a memory image for various reasons. Hence this is what the first release of plugins is all about.

Luckily Volatility has an option for plugins to have more than one output option. If you look at the code in forensics/commands.py you'll see the following (line numbers not included):


82 function_name = "render_%s" % self.opts.output
83 if not self.opts.out_file:
84 outfd = sys.stdout
85 else:
86 outfd = open(self.opts.out_file,'w')


This allows plugins to have more than one output function. For example a plugin might have a render_text function that would print to stdout as usual, a render_html function that prints out in html style, a render_sql function that does some SQL actions etc etc... The framework allows the user to pick which output option s/he wants and the output file on the command line as defined in vutils.py:


45 def get_standard_parser(cmdname):
...
...
59 op.add_option('-H','--output',default = 'text',
60 help='(optional, default="text") Output format (xml, html, sql)')
61 op.add_option('-O', '--out_file', default=None,
62 help='(output filename to write results onto - default stdout)')


Therefore, if there is a plugin that has an html output option, it can be invoked from the command line like so:


./volatility <plugin> -H html -O <out_file> -f mem.dd


Quite cool :-)

Plugin Structure

If you are interested in writing plugins for Volatility, you really should read Andreas Schuster's slides. They go into nice detail on how to write plugins for the framework. Here I will simply give you the gist :-)

The "skeleton" for the plugins is defined in forensics/commands.py. Items of interest include the help() function which is the plugin description you see when you run Volatility with the help option:


./volatility -h


Also of interest is the parser() function, which allows the plugin to modify its command line options. There is also the calculate() function, which is where the real work is done. The last item of our interest is the execute() function which allows us to calculate and collect the desired data from the memory image and then output it using the plugin's chosen render_* function.

The plugins I'm releasing now consist of core commands (defined in vmodules.py) that have been converted to this code structure so I could have more than one type of output for each of these commands. The plugins in this package are:

memory_plugins/connections_2.py
memory_plugins/dlllist_2.py
memory_plugins/files_2.py
memory_plugins/modules_2.py
memory_plugins/pslist_2.py
memory_plugins/sockets_2.py


Schema

The schema for these plugins is quite simple and not much different than the original output for these core commands. There is an extra field for the name of the memory image that was analyzed in case someone would like to place information for more than one memory image into a SQLite database. This may change at some point and of course you are free to change it as you like. It's enough for what I needed, however.

connections_2.py

Table Name: connections

pid Process ID
local Local connection information
remote Remote connection information
memimage Memory image information was extracted from


memory_plugins/dlllist_2.py [Edit: 2/16/10 new schema]

Table Name: dlls

image_file_name Process name
pid Process ID
cmdline Command Line text
base Base Address
size Size
path Path of DLL
memimage Memory image information was extracted from


memory_plugins/files_2.py

Table Name: files

pid Process ID
file Open file
num Number of times file is open by pid
memimage Memory image information was extracted from


memory_plugins/modules_2.py

Table Name: modules

file Module Path
base Base Address
size Size
name Module Name
memimage Memory image information was extracted from


memory_plugins/pslist_2.py

Table Name: process

pname Process Name
pid Process ID
ppid Parent Process ID
thrds Threads
hndl Handle Count
ctime Creation Time
memimage Memory image information was extracted from


memory_plugins/sockets_2.py

Table Name: sockets

pid Process ID
port Port
proto Protocol
ctime Creation Time
memimage Memory image information was extracted from


Installation

First, make sure you have SQLite3 installed along with support for Python. Now download the Volatility code from the SVN. Download the plugins from here. A listing of the plugins is as follows:


$ tar -tzf vol_sql.tgz
vutils.py
forensics/commands.py
memory_plugins/connections_2.py
memory_plugins/dlllist_2.py
memory_plugins/files_2.py
memory_plugins/modules_2.py
memory_plugins/pslist_2.py
memory_plugins/sockets_2.py


Make a backup of your vutils.py and forensics/commands.py files if you like. I had to make a small modification to both of these files to get the plugins working properly. Then place the tar file into your Volatility directory and type:


$ tar -xvzf vol_sql.tgz


Each of the redefined core commands end with "_2" so pslist becomes pslist_2 and connections becomes connections_2 and so on. So if I wanted to dump the output of the connections_2 plugin to a SQLite file I would type the following:


./volatility connections_2 -H sql -O test.db -f mem.dd


After running all of the new commands to the same SQLite3 file, I can then look at what I have stored:


$ sqlite3 test.db
SQLite version 3.5.9
Enter ".help" for instructions
sqlite> .table
connections dlls files modules process sockets
sqlite> .schema
CREATE TABLE connections (pid integer, local text, remote text, memimage text);
CREATE TABLE dlls (image_file_name text, pid integer, cmdline text, base text, size text, path text, memimage text);
CREATE TABLE files (pid, file, num, memimage);
CREATE TABLE modules (file text, base text, size text, name text, memimage text);
CREATE TABLE process (pname text, pid integer, ppid integer, thrds text, hndl text, ctime text, memimage text);
CREATE TABLE sockets (pid integer, port integer, proto text, ctime text, memimage text);
sqlite> select * from files where pid = 4 and file like '%SEC%';
4|\WINDOWS\system32\config\SECURITY|1|/home/levy/forensic/evidence/10.vmem
4|\WINDOWS\system32\config\SECURITY.LOG|1|/home/levy/forensic/evidence/10.vmem
sqlite> .quit


You can make as many complex queries as you like now :-)

Saturday, December 19, 2009

More Misc Stuff

I recently came across a couple of tools that may be helpful to someone and I have created a repository for some of my stuff:

Maatkit

Maatkit has a lot of cool utilities that allow you greater control of MySQL. I recently found it very useful for restoring an extremely large MySQL dump by using the mk-parallel-restore. For information about its feature, either visit the website or you can check out this Linux Magazine article.

HTMLDOC

HTMLDOC allows you create PDF documents of html pages. You can convert pages one page at a time, or as a book. So you could use wget to download the pages of a website recursively, including the graphics and then pdf'ify it into one book with references... pretty useful.

Some of my stuff

Since I'm not sure how much longer I will have my academic website, I am starting to move some of the code that's been hosted there to another location. I have also added a few things that are not listed on the old code page or elsewhere on my academic site, such as a DC3 Image Assember script that worked with the last DC3 challenge (haven't looked at the current one) and a Virus Total hash checker that takes a list of hashes and posts them to Virus Total to build an html report. This last one needs some modification however, since if one is checking lots of files Virus Total starts to report errors... Hopefully I'll have some time to create a new version in the future...

Monday, August 03, 2009

Briefly: recordmydesktop

Occasionally I have needed to make screencasts for my students so that they would have something to look at in their own time. There are two tools that make this easy on Linux (both should available in the yum or apt repositories):

Recordmydesktop does as it sounds: it records the desktop. It has options to set the size of the area to record as well as the window you would like to record. I like to choose the window option myself. I also like to record without sound, but you can figure out how to modify the script to remove that option if you so choose.

FFmpeg is a nice tool that allows you to convert, record and stream audio and video. I use it to convert the resulting video from recormydesktop to flv format in order to upload to photobucket or elsewhere.

To make my life easier, I have created the following script that takes in 1-2 arguments. The first argument should be the desired name of the resulting video file. The second argument is an (optional) amount of time to wait before recording. The default wait time is 3 seconds.

When you run the script it waits for you to click on the window that you wish to record by using xwininfo to get the window id number. You will notice that the mouse changes to a + sign as it is waiting for you to click. Once you click the window, it will begin recording that window area after the appropriate wait time has transpired. The video is converted to [chosen filename].flv after you have stopped recording (CTRL+C in terminal from which you started the script).

Feel free to do with as you please. The script can be found below:


#!/bin/bash
#
# Warning: this does not have robust error checking!

bad=67
if [ $# -lt 1 ]
then
echo "Usage: $0 [filename] [[optional time]]"
exit $bad
fi

if [ $# -eq 1 ] #check for arguments
then
time=3 #if one (only filename) exists, sleep for 3 seconds
filename=$1 #set filename
else
time=$2 #else, we'll sleep for $2 seconds
filename=$1 #set filename
fi

recordmydesktop -windowid `xwininfo |grep "Window id:"|sed -e "s/xwininfo\:\ Window id:\ //;s/\ .*//"` -o $filename.ogv -delay $time --no-sound

ffmpeg -i $filename.ogv -b 384000 -s 640x480 -pass 1 -passlogfile log-file $filename.flv

Thursday, July 30, 2009

Cygwin Installation

Note: I am reusing a post from my forensics class at John Jay College. This will be used as a reference for an upcoming post on Volatility module installation. So be patient, there is more to come...

This post goes over an installation of Cygwin which is a Linux-like environment for windows. Since most of you have Windows machines, this will allow you run tools that normally run under Linux/Unix environments.

The setup file is here.

When you download setup, double click it. You should see the following:


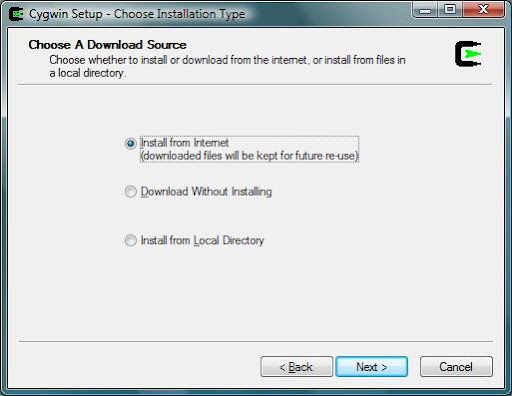
Press ``Next'' and choose ``Install from the Internet'' :


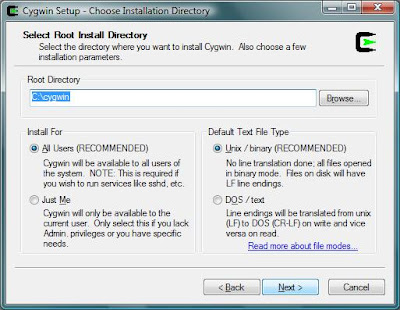
Choose where to install Cygwin (by default it is in C:\Cygwin):


Cygwin will create a directory in which it will store the its files during installation. After installation you can delete the folder. The default location is the desktop:


Select your internet connection. The default is OK:


Select a mirror (mirrorservice.org is good):


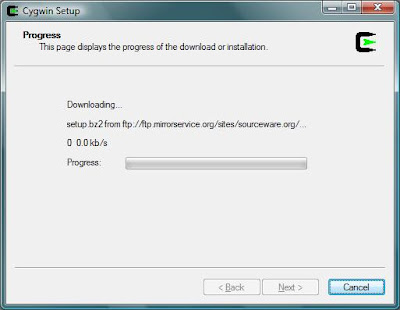
Press ``Next'' You should see the following:


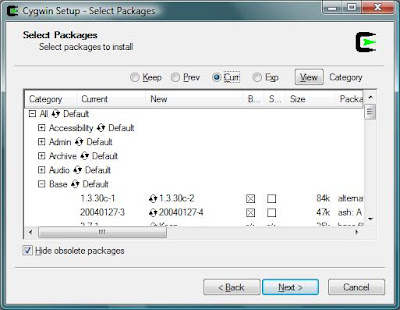
Next you will see a list of packages you can download. By default these are organized by category:


If you press the plus signs on the left hand side, it will open up the category and you can select specific packages:


Here is a list of packages you need organized by category:

    From the Base category
  1. Everything
    From the Devel category
  1. Gcc: C, C++, Fortran compilers
  2. gcc-mingw: Mingw32 support headers and libraries for GCC
  3. gcc2: Version X.XX.X [whatever is latest] of C, C++, Fortran compilers
  4. gdb: The GNU Debugger
  5. make: The GNU version of the `make' utility
  6. mingw-runtime: MinGW Runtime
  7. openssl-devel: The OpenSSL development environment
    From the Editors category
  1. Nano: A pico clone text editor with extensions [works like pico]
  2. vim: Vi Improved – enhanced vi editor
    From the Interpreters category
  1. Perl
  2. Python
    From the Utils category
  1. until-linux: Random collection of Linux utilities
  2. file
  3. ELFIO
    From the Text category
  1. less: A file pager program, similar to more(1)


After you have made your selections, press next for installation to begin. This part is the actual installation, and may take some time. Just let it finish. After it finishes you will be asked if you want to create shortcuts on the desktop. Make sure to click Finish.

Running Cygwin

When you run Cygwin for the first time, it might take a little longer to start up. This is because it is configuring
a few more files for your environment. Then you should get a command line prompt that looks like:

You are now able to work on your programs at home on your windows machines.

Monday, March 30, 2009

Briefly: IWCMC 2009

Jarek, Prof Bilal Khan (BK) and my paper on Permeate was accepted at IWCMC 2009 Computer and Network Security Symposium. The final paper will be available at the Permeate site after some final editing.

Shouts to Jarek and BK!

Sunday, November 16, 2008

Permeate MITM

It's been a long while. For that I apologize... I guess I'm not a very good blogger when the semester is in full stride. Anyway, there's a new code release for Permeate, this time with the MITM detection built in. A paper we recently submitted to ICC 09 is available there as well. Shouts to Jarek and BK :-)

Enjoy!

Friday, September 12, 2008

PyFlag on Windows

PyFlag is now available on Windows. I haven't had a chance to try it on Windows, but I will soon and then I'll report on it.

I've used it on Linux however, and it's really nice :-)

Monday, August 11, 2008

Network Distance Script

I have decided to release some more code. I'm not claiming any of this is good, but it has served a purpose either personally or in the classroom at some point. The last item added is a distance perl script to measure Levenshtein distance of two pcap files.

I wrote this for some experiments with malware some time back. I figured I should share it in case it is of use to someone before I misplace it :-) More details are included in the script itself.

Tuesday, July 15, 2008

Linux Memory Forensics

I knew something good would come out of the DFRWS forensic challenge. This is really great. I just had to say something about it :-)

I would have liked to have worked on the challenge myself, but with a full-time teaching schedule and other projects, just couldn't fit in the time. I was anxious to see what would happen this year, however.

Good job, guys :-)

Monday, July 14, 2008

PTK 0.2 Released

PTK labs has released beta 0.2. Improvements include searching for strings in slackspace and a new installer. Now installation will be somewhat easier. You simply have to unzip the files into your apache owned folder (var/www/, /var/www/htdocs, /var/www/html etc). Make sure the permissions are set correctly. Open your browser and go to http://127.0.0.1/ptk/install.php You will see the installation page and can just fill it out as needed.

Edit 10/18: I've decided to add a patch to address the comment below.
Apply it as follows:


patch -b install.php install_diff.txt

Sunday, July 06, 2008

PTK on Fedora 8

Wow, this was a painful install... and I'm not even sure if it's completely over :-/ Though I haven't been able to get this working completely with all of my practice images, PTK looks somewhat promising. Update: PTK works see update at the end.

Anyway, before you get started, you should make sure to install all of the packages you need:


mysql
mysql-server
php
php-mysql
php-mbstring
httpd
Sleuthkit


In addition, according to the help forums, you also need the following libraries for Sleuthkit (I must have had a previous version because I haven't had to do this before):


afflib
libewf


The following package is not *required* but can help you a lot if you are not used to command line management of mysql databases:


phpMyAdmin


With all of the above packages, just do a ``yum install''. After you start MySql and httpd you should be set. I have already gone over how to set up MySQL and will not repeat it here. If you want to make sure that everything has installed correctly, you can see the php information by created a file called info.php in the /var/log/www/html directory that contains:


<?php
phpinfo();
?>


To see the information, open a browser and go to http://127.0.0.1/info.php. Scroll down until you see the following:


Now, download the PTK sourcecode. After you extract it, you should have a folder that contains a license file, Setup file, PTK.sql file and another tarball. Make sure that the md5 hash values are correct:


$ cat md5sums.txt
76b10e2f1c8bfd25a7128e1ca4f3009a ptk-beta_0.1.tar.gz
15d83f58161f816db660c65cf12c717e PTK.sql
e7cebc317dda69f2df81856118d924f3 Setup
$ md5sum -c md5sums.txt
ptk-beta_0.1.tar.gz: OK
PTK.sql: OK
Setup: OK


I tried just using the Setup file and failed miserably. I would get the nice welcome screen, but couldn't log in to PTK. Then I tried the manual install shown in the tutorial... It also didn't work. Things were getting installed in the wrong directories, even after I had told it where to install correctly using the original Setup script. Also, the Setup script looks for files called md5 and sha1, which are called md5sum and sha1sum on my machine...

So after analyzing the Setup file, I wrote a patch and finally got PTK working which you can find here. To apply the patch type:


patch -b Setup fedora-patch.txt


This will make a backup of the Setup file in case things go awry.

Make sure that you pay attention to output of the Setup script and check to see if there are any errors. If things go well, you should see the following screens:


If everything goes ok, you should have PTK installed in your /var/www/html/ptk directory. You can start it by going to: http://127.0.0.1/ptk. You have to log in using the ``admin'' account, and hopefully you don't forget your password you used for this!


Issues All but the last issue are resolved:
I am not yet sure of the cause of all of these issues, but I thought I would list things here.
  • fatv images do not seem to be recognized and I am unable to browse the file system at all.
  • I am unable to get an initial correct hash of the image without running the browser as root
  • After the initial hash is taken, verification yields an incorrect hash (see pic below) and I suspect it is hashing the symbolic link and not the image itself. The top md5sum hash is correct, the second verification one is not.
  • If you have SELinux working, you will have to use workarounds to let this program work (which is an SELinux thing, not a PTK thing exactly)
  • When you search for images, you are initially directed to the /var/log/www/ptk/images folder, which is fine. If you add a disk image there, you do not see it. You have to go back 2 directories and then forward again before the disk image appears


Edit: PTK Works

As I wrote previously, I managed to get PTK installed on Fedora 8. I had a few issues with seeing the images at the end, however. It was a permissions problem. I can't believe I missed that. But it works and it seems fun. So if you are installing PTK on Fedora, follow the earlier instructions and use the patch I made and then check the permissions of the ptk folder to make sure that it is owned by apache (or whatever user you have as your webserver). If it isn't then do a recursive chown:


# chown -R apache.apache /var/www/html/ptk


I have only a couple of complaints: The folders are kind of hard to see on the left hand side, but there may be some way to remedy that. Also, I'm still having the problem of having to go back two folders and then forwards when importing an image, but I guess it's not that bad... Still, PTK has some nice options, like the gallery view, and the interface is nice. So far I like it :-)

Wednesday, July 02, 2008

MDD

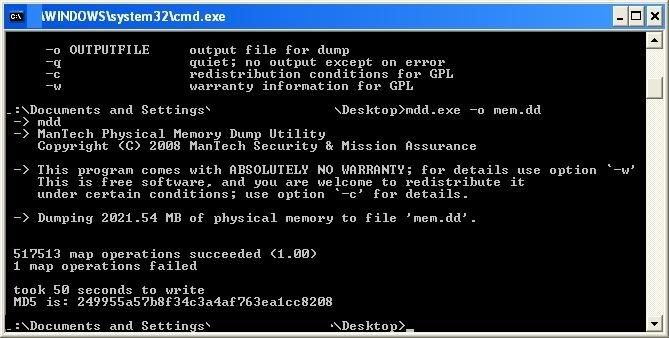
I'm finally writing about trying MDD on XP SP 3:


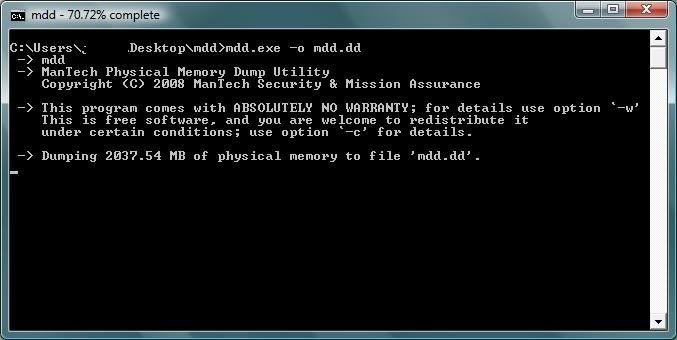
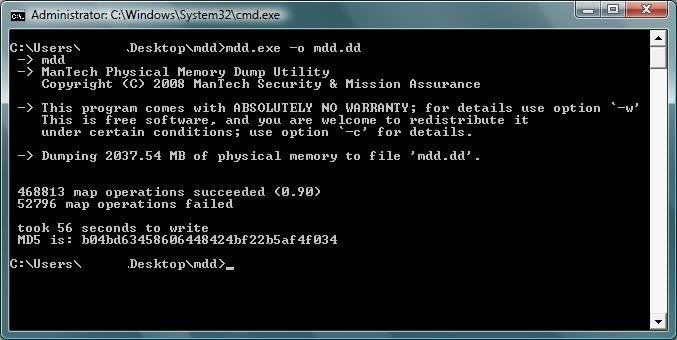
And Vista:


It works nicely and in the case of dumping XP memory, you can do analysis with Volatility afterwards. (Note: Make sure you are running the cmd as Admin.) Another nice feature is that it gives you an md5 hash of the memory image after it finishes dumping.

I also tried win32dd on Vista. It worked fine as well. (I forgot to take a screen shot but will get one soon). I was surprised at first because it seemed to work much faster than MDD, since it gave me the all clear and appeared to have finished. I then checked the size of the dump and it was too small, so at first I thought it had failed. Later I checked the dump and it was 2 GB as needed, so it did work, but must have finished dumping in the background.

Tuesday, June 17, 2008

Memory Acquisition Just Got Easier

This is for those who asked me to keep this material up, for your further studies :-)

As you may remember, the traditional dd.exe method does not work on Windows 2003 sp 1 and above. Two opensource tools have been released that get past this:

Memory DD
Win32dd

For more details check out Volatility's blog.