For those who can't wait for the official release of 1.4: I've updated the Volatility Full Dev Installation Wiki to include installation on Linux.
In case you want to automate installation you can use the new get_plugins script. I've only tested it on Mac OSX and Ubuntu, but it should still install dependencies and Volatility 1.4 on other Linux distributions (provided that you have your supporting libraries like libpcre installed already). Feel free to look at the code before running however :-)
Caveat: There is still an issue with the Distorm3 library on Mac OSX and you'll have to compile and install that one manually.
Showing posts with label installation. Show all posts
Showing posts with label installation. Show all posts
Tuesday, March 22, 2011
Monday, December 06, 2010
Volatility 1.3 get_plugins Script Update
I've finally gotten around to updating the get_plugins script I wrote a while back for Volatility 1.3 (and finally gotten around to blogging about it). This is due to a few changes in plugins, dependencies and to address difficulties mentioned in lorgor's blog.
MHL has also updated malfind2 to work with Yara 1.4a, so this script is compatible with those changes.
I have only tested this on Ubuntu and Mac OSX (with MacPorts installed).
You still have to install Inline::Python on your own.
You can find the script in my GitHub repository or as raw text here
MHL has also updated malfind2 to work with Yara 1.4a, so this script is compatible with those changes.
I have only tested this on Ubuntu and Mac OSX (with MacPorts installed).
- You must run this script as root
- This script also installs Volatility using SVN. If you are running Ubuntu or Mac it will check that SVN is installed, and if not, will install it and pull down Volatility in the current directory.
- If you are running Ubuntu or Mac OSX, this script will install other dependencies you will need like pcregrep libpcre++-dev python-dev for Ubuntu or pcre pcre++ for Mac.
- This script installs dependencies: pefile, libdasm, pycrypto, yara-python 1.4a, as well as all known Volatility plugins, including the newer VAP ones from MHL
You still have to install Inline::Python on your own.
You can find the script in my GitHub repository or as raw text here
Sunday, November 08, 2009
Briefly: New VDP Mac OSX Document
We have received a new submission to the VDP. Keep them coming :-)
Dougee has submitted an install manual for Snow Leopard. It covers installation from the official tar ball release as well as from the SVN repository. It also covers installing some of the plugin dependencies. Shouts to Dougee!
Dougee has submitted an install manual for Snow Leopard. It covers installation from the official tar ball release as well as from the SVN repository. It also covers installing some of the plugin dependencies. Shouts to Dougee!
Wednesday, October 21, 2009
Volatility Get Plugins Bash Script
Earlier I had written about all of the known Volatility plugins and how to go about installing them. Now I've decided to make things even easier for some, by including a bash script that will download and install all of these plugins. It will also install pefile, pycrypto and pydasm. I have tested it on a linux box as well as a cygwin installation.
Make sure you are running this as root (or with sudo) if you are doing this under Linux. Also make sure you have subversion installed.
Prereqs for Cygwin:
Obviously you must have Cygwin installed. In addition to what I have listed in a previous post, you will also need to install:
* wget
* unzip
* svn (subversion)
Hopefully I haven't forgotten anything... let me know if I have.
Simply unzip the bash script into the directory where you want Volatility installed. Then run the script:
This bash script removes one of the example files (memory_plugins/example3.py) since it has a conflicting _EPROCESS definition, so if you want that file - simply comment out that remove statement.
You will have to install Inline::Python yourself until I figure out a way to get it installed in a general fashion.
Let me know if you encounter errors.
Make sure you are running this as root (or with sudo) if you are doing this under Linux. Also make sure you have subversion installed.
Prereqs for Cygwin:
Obviously you must have Cygwin installed. In addition to what I have listed in a previous post, you will also need to install:
* wget
* unzip
* svn (subversion)
Hopefully I haven't forgotten anything... let me know if I have.
Simply unzip the bash script into the directory where you want Volatility installed. Then run the script:
$ ./get_plugins.bsh
This bash script removes one of the example files (memory_plugins/example3.py) since it has a conflicting _EPROCESS definition, so if you want that file - simply comment out that remove statement.
You will have to install Inline::Python yourself until I figure out a way to get it installed in a general fashion.
Let me know if you encounter errors.
Wednesday, August 12, 2009
Installing Volatility Plugins
So you've already installed Volatility using SVN and you want to try out some of the community plugins that people are raving about. Publicly known plugins are listed on the forensics wiki. The wiki contains links to plugins as well as links to blogposts/articles for further information on installation, dependencies and how they work.
Most plugin installation is straightforward where one may simply place the plugin in the memory_plugins directory within the Volatility directory. Some are only slightly more complicated by needing a helper library installed in addition to the plugin itself. Others are even more complicated and require some installation of Python libraries which may or may not need the help of other compiled libraries. Therefore we have three cases for plugin installation (please visit the forensics wiki for more information):
For an example of a simple installation, we will install the volshell plugin. Simply download the volshell.py file and place it into your memory_plugins directory. You can test to make sure that is installed correctly by running Volatility without any arguments and volshell should appear under "Supported Plugin Commands" highlighted below in Figure 1. All other "simple case" plugins should install the same way.

Figure 1: Installation of volshell
The ssdt and threadqueues plugins require that the lists.py library file be placed in the forensics/win32 directory in addition to placing the ssdt.py and threadqueues.py into the memory_plugins folder as before. The driverirp plugin requires the driverscan plugin in order to work. Both of these plugins are placed in the memory_plugins directory.
After placing the files in the appropriate places, check to make sure that the plugins are properly installed by running volatility without any arguments as before and checking under "Supported Plugin Commands" (Figure 1).
For the "most complex cases" other libraries must be installed for the plugin to work properly. First we will look at installing the malfind plugin. First of all, download the malfind.py plugin file and place it in the memory_plugins directory. Now you must install the pydasm and pefile libraries.
In order to install the pydasm library, you will have to do some initial setup including by installing a gcc compiler and make. For this tutorial, we will use MinGW.
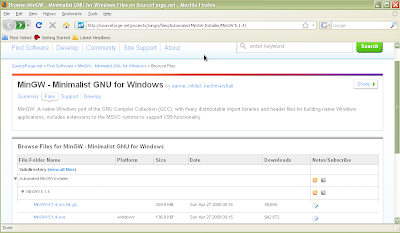
Figure 2: Sourceforge download site for MinGW
Download the windows installer for MinGW from the sourceforge website (Figure 2). Double click to install (Figure 3-9).

Figure 3: Choose "Download and Install"
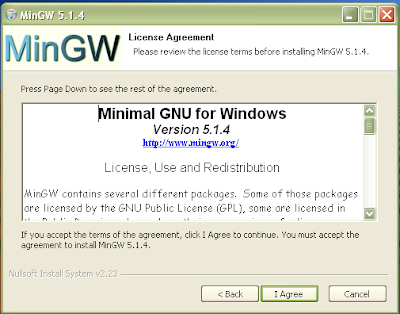
Figure 4: Click "Agree"

Figure 5: Choose "Current"

Figure 6: Choose compilers and MinGW make
You do not necessarily have to install all compilers however, for simplicity, do a full install.
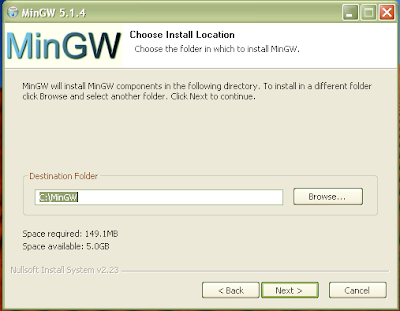
Figure 7: Choose location for installation. The default is fine.
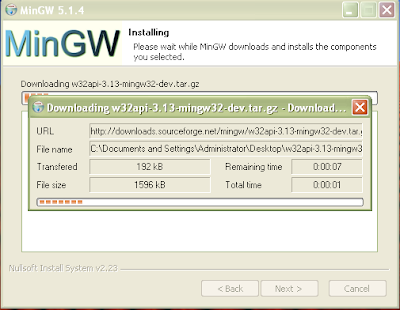
Figure 8: Installing
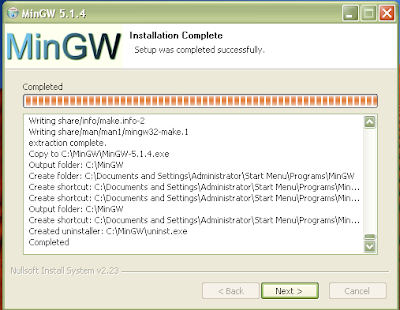
Figure 9: installation complete
Once the installation is complete and you have clicked finish, you will have to make a few adjustments to the installation in order to get things working properly. First of all, we need to have an executable called "make.exe". The make executable for MinGW is appropriately named mingwmake.exe. Simply copy this executable and paste it into the same directory (C:\MinGW\bin) which should result in an identical copy named "Copy of mingwmake.exe". Rename this executable to "make.exe" as shown in Figures 10-11.
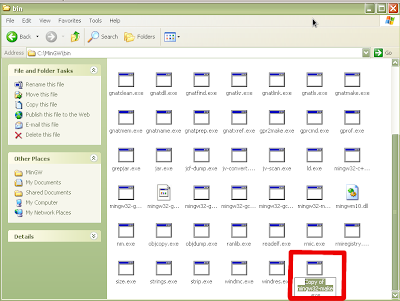
Figure 10: "Copy of mingwmake.exe"
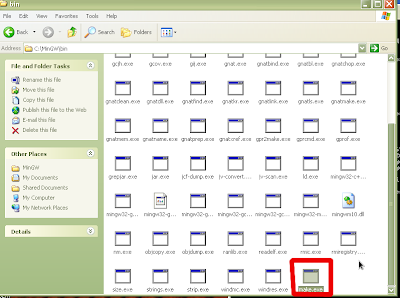
Figure 11: Rename to "make.exe"
Now we have to modify our path to include the executables for MinGW. If you have a regular start menu, click on start and then right click on “My Computer” and choose properties. If you have the classic start menu, just right click on “My Computer” and choose properties. Click on the “Advanced” tab and then click on “Environmental Variables”. Click on the Path system variable towards the bottom of the window and click the “Edit” button. We will append the path of our Python installation to the end of the existing Path variable. Where it says “Variable Value” go to
the end of the line and add the following (if you installed MinGW in a different location, modify appropriately):
;C:\MinGW\bin
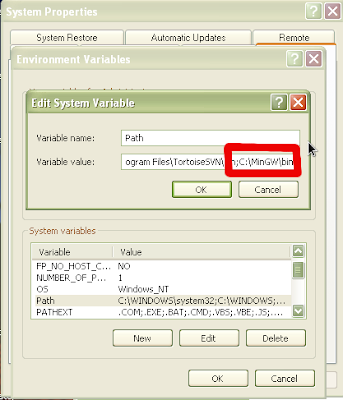
Figure 12: Adding C:\MinGW\bin to the path variable
Now for installing pydasm. Download the source code for libdasm. The easiest way to extract the contents from this tar ball is using 7zip. Once you have 7zip installed, you can associate all zip files by starting the 7zip Filemanager (Start->Programs->7-zip->7-zip File Manager) and clicking on "Tools->Options" and clicking "Select all" in the system tab and "OK" (Figure 13).

Figure 13: Associating zip file types
At this point you are ready to extract the libdasm/pydasm source code. Double click the downloaded pydasm tar ball. You should see the following:

Figure 14: Opening libdasm tar ball with 7-zip
Double click on the libdasm*.tar file inside from within the 7-zip application until you see a folder icon with the name libdasm-1.5 (or other version number):

Figure 15: libdasm folder
Highlight the folder and then click on the extract button and say OK. The folder will extract with all source code inside to the path you choose, or by default the current directory:

Figure 16: Extracting the libdasm source code
Now open a command prompt and change directories until you are in the newly extracted libdasm folder. Type the following commands:
That's it! You've installed pydasm.
Now you are ready to install the pefile library. Grab the zip file or tar ball of the source code and extract is as you did before. Go into that resulting folder and type the following:
Now you've installed pefile. Now you should see the malfind plugin listed under supported plugins for Volatility. All the other plugins that were depend on pefile should work as well if they are installed in the memory_plugins directory.
Installing the volreg plugin requires pycrypto. Simply go the gitweb interface for this project and download the latest git snapshot by clicking on "snapshot". This will download a tar ball file of the source code. Simply extract it as you did before, then open the command prompt and change into that directory. Then type the following:
You've now installed the pycrypto library. Download the volreg tarfile and extract the contents into your Volatility folder by double clicking as before, selecting all three folders and changing the extraction path to your Volatility folder. All files should be placed into the correct location:
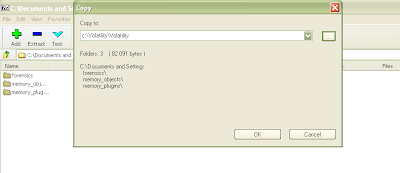
Figure 17: Extraction of volreg into Volatility directory.
Next time we will cover the volrip plugin after I figure out how to get Inline::Python working under windows...
Most plugin installation is straightforward where one may simply place the plugin in the memory_plugins directory within the Volatility directory. Some are only slightly more complicated by needing a helper library installed in addition to the plugin itself. Others are even more complicated and require some installation of Python libraries which may or may not need the help of other compiled libraries. Therefore we have three cases for plugin installation (please visit the forensics wiki for more information):
- Simple Case - only in memory_plugins
- volshell
- IDT
- cryptoscan
- orphan_threads
- keyboardbuffer
- getsids
- moddump
- objtypescan
- symlinkobjscan
- driverscan
- fileobjscan
- pstree
- More Complex Case - also supporting file(s)
- Most Complex Case - installation of supporting libraries
Simple installation of volshell
For an example of a simple installation, we will install the volshell plugin. Simply download the volshell.py file and place it into your memory_plugins directory. You can test to make sure that is installed correctly by running Volatility without any arguments and volshell should appear under "Supported Plugin Commands" highlighted below in Figure 1. All other "simple case" plugins should install the same way.

Figure 1: Installation of volshell
More Complex Cases
The ssdt and threadqueues plugins require that the lists.py library file be placed in the forensics/win32 directory in addition to placing the ssdt.py and threadqueues.py into the memory_plugins folder as before. The driverirp plugin requires the driverscan plugin in order to work. Both of these plugins are placed in the memory_plugins directory.
After placing the files in the appropriate places, check to make sure that the plugins are properly installed by running volatility without any arguments as before and checking under "Supported Plugin Commands" (Figure 1).
Most Complex Cases
For the "most complex cases" other libraries must be installed for the plugin to work properly. First we will look at installing the malfind plugin. First of all, download the malfind.py plugin file and place it in the memory_plugins directory. Now you must install the pydasm and pefile libraries.
In order to install the pydasm library, you will have to do some initial setup including by installing a gcc compiler and make. For this tutorial, we will use MinGW.

Figure 2: Sourceforge download site for MinGW
Download the windows installer for MinGW from the sourceforge website (Figure 2). Double click to install (Figure 3-9).

Figure 3: Choose "Download and Install"

Figure 4: Click "Agree"

Figure 5: Choose "Current"

Figure 6: Choose compilers and MinGW make
You do not necessarily have to install all compilers however, for simplicity, do a full install.

Figure 7: Choose location for installation. The default is fine.

Figure 8: Installing

Figure 9: installation complete
Once the installation is complete and you have clicked finish, you will have to make a few adjustments to the installation in order to get things working properly. First of all, we need to have an executable called "make.exe". The make executable for MinGW is appropriately named mingwmake.exe. Simply copy this executable and paste it into the same directory (C:\MinGW\bin) which should result in an identical copy named "Copy of mingwmake.exe". Rename this executable to "make.exe" as shown in Figures 10-11.

Figure 10: "Copy of mingwmake.exe"

Figure 11: Rename to "make.exe"
Now we have to modify our path to include the executables for MinGW. If you have a regular start menu, click on start and then right click on “My Computer” and choose properties. If you have the classic start menu, just right click on “My Computer” and choose properties. Click on the “Advanced” tab and then click on “Environmental Variables”. Click on the Path system variable towards the bottom of the window and click the “Edit” button. We will append the path of our Python installation to the end of the existing Path variable. Where it says “Variable Value” go to
the end of the line and add the following (if you installed MinGW in a different location, modify appropriately):
;C:\MinGW\bin

Figure 12: Adding C:\MinGW\bin to the path variable
Now for installing pydasm. Download the source code for libdasm. The easiest way to extract the contents from this tar ball is using 7zip. Once you have 7zip installed, you can associate all zip files by starting the 7zip Filemanager (Start->Programs->7-zip->7-zip File Manager) and clicking on "Tools->Options" and clicking "Select all" in the system tab and "OK" (Figure 13).

Figure 13: Associating zip file types
At this point you are ready to extract the libdasm/pydasm source code. Double click the downloaded pydasm tar ball. You should see the following:

Figure 14: Opening libdasm tar ball with 7-zip
Double click on the libdasm*.tar file inside from within the 7-zip application until you see a folder icon with the name libdasm-1.5 (or other version number):

Figure 15: libdasm folder
Highlight the folder and then click on the extract button and say OK. The folder will extract with all source code inside to the path you choose, or by default the current directory:

Figure 16: Extracting the libdasm source code
Now open a command prompt and change directories until you are in the newly extracted libdasm folder. Type the following commands:
make
cd pydasm
python setup.py build -c mingw32
python setup.py install
That's it! You've installed pydasm.
Now you are ready to install the pefile library. Grab the zip file or tar ball of the source code and extract is as you did before. Go into that resulting folder and type the following:
python setup.py build
python setup.py install
Now you've installed pefile. Now you should see the malfind plugin listed under supported plugins for Volatility. All the other plugins that were depend on pefile should work as well if they are installed in the memory_plugins directory.
Installing the volreg plugin requires pycrypto. Simply go the gitweb interface for this project and download the latest git snapshot by clicking on "snapshot". This will download a tar ball file of the source code. Simply extract it as you did before, then open the command prompt and change into that directory. Then type the following:
python setup.py build
python setup.py install
You've now installed the pycrypto library. Download the volreg tarfile and extract the contents into your Volatility folder by double clicking as before, selecting all three folders and changing the extraction path to your Volatility folder. All files should be placed into the correct location:

Figure 17: Extraction of volreg into Volatility directory.
Next time we will cover the volrip plugin after I figure out how to get Inline::Python working under windows...
Monday, August 03, 2009
Volatility SVN
Since the last post on Volatility some of you may be wondering how you may download the newest source of Volatility from the Google SVN repository. Well for Linux it's very easy. After you install subversion using yum or apt-get, you simply follow the instructions on the website:
where [folder name] is replaced by the name of the folder you want to contain the downloaded code.
For Windows users, it's only slightly more complicated. First you must install a subversion client. For this post we will use Tortoise SVN.
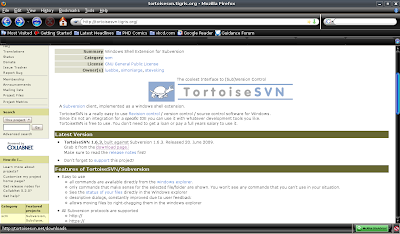
Figure 1: Tortoise SVN website
Go to the downloads section and choose the appropriate installer. For this post we are choosing the 32 bit version.

Figure 2: Tortoise SVN website - downloads section
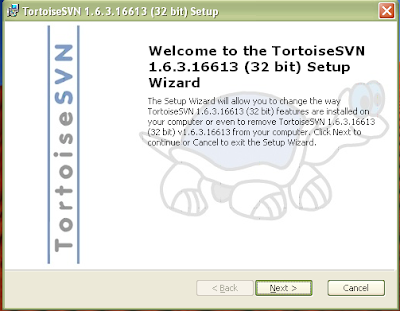
Once you have downloaded the installer, run it. You may see the following security warning, just click Run. All defaults should be fine, so keep clicking next until the installation finishes.
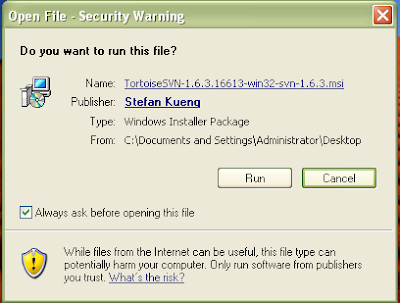
Figure 3 and 4: Running the Tortoise SVN installer
After the installation is complete, you will have to restart your computer. After restart you should see the following menu added when you right click:
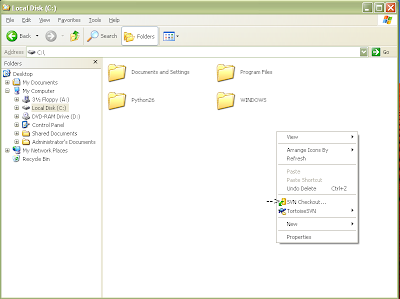
Figure 5: Tortoise SVN right click menu options
Create a folder for the repository (for this run through we will create a folder called Volatility on the root of the drive (C:\). Right click and choose "SVN Checkout" noted in the picture above. After choosing this menu, you should see the following:
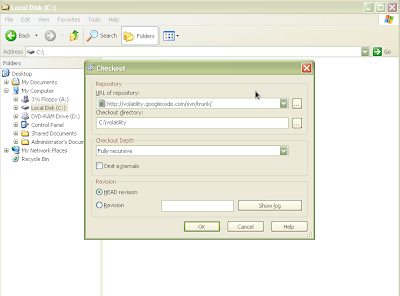
Figure 6: Filling in options to download Volatility
Paste the url of the repository: http://volatility.googlecode.com/svn/trunk/ in the first text box and the location of the newly created folder in the second text box (as shown above). Leave the other options the same as shown above. Press OK. You should see the following as it begins downloading and then finishes:
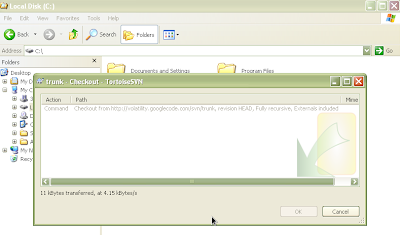
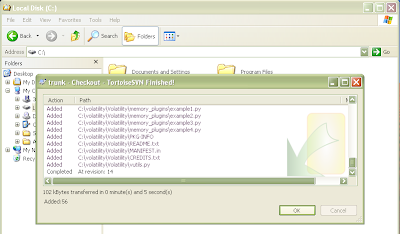
Figure 7 and 8: Downloading Volatility from SVN
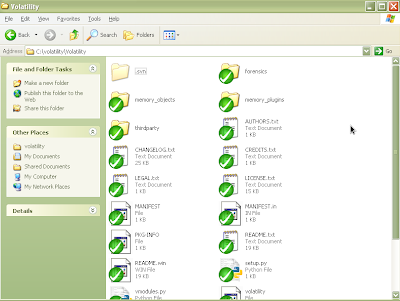
The newly created folder should now contain the SVN repository. This includes another folder named "Volatility" that contains the actual source code. If you go inside the inner Volatility folder you should see the python source code files as shown in Figure 10.
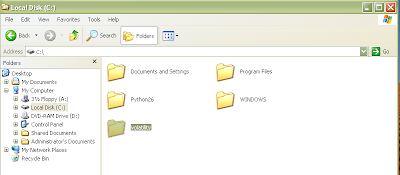
Figure 9 and 10: Newly created folder containing Volatility SVN repository.
To test the newly downloaded code, open a command shell, go inside the Volatility folder (which is inside your newly created folder) and type "python volatility" without the quotes. (This is assuming you have already installed Python, which is covered in the installation manual.) See below:
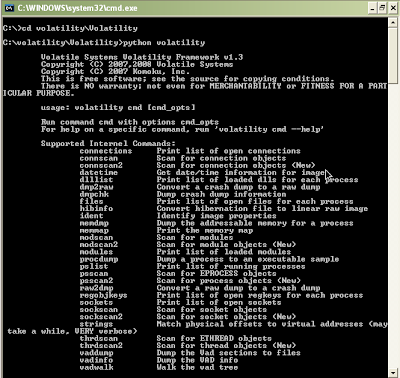
Figure 11: Running Volatility
Now you're set. You have the latest source code for Volatility. Next will be how to install plugins...
$ svn checkout http://volatility.googlecode.com/svn/trunk/ [folder name]where [folder name] is replaced by the name of the folder you want to contain the downloaded code.
For Windows users, it's only slightly more complicated. First you must install a subversion client. For this post we will use Tortoise SVN.

Figure 1: Tortoise SVN website
Go to the downloads section and choose the appropriate installer. For this post we are choosing the 32 bit version.

Figure 2: Tortoise SVN website - downloads section
Once you have downloaded the installer, run it. You may see the following security warning, just click Run. All defaults should be fine, so keep clicking next until the installation finishes.

Figure 3 and 4: Running the Tortoise SVN installer

After the installation is complete, you will have to restart your computer. After restart you should see the following menu added when you right click:

Figure 5: Tortoise SVN right click menu options
Create a folder for the repository (for this run through we will create a folder called Volatility on the root of the drive (C:\). Right click and choose "SVN Checkout" noted in the picture above. After choosing this menu, you should see the following:

Figure 6: Filling in options to download Volatility
Paste the url of the repository: http://volatility.googlecode.com/svn/trunk/ in the first text box and the location of the newly created folder in the second text box (as shown above). Leave the other options the same as shown above. Press OK. You should see the following as it begins downloading and then finishes:

Figure 7 and 8: Downloading Volatility from SVN

The newly created folder should now contain the SVN repository. This includes another folder named "Volatility" that contains the actual source code. If you go inside the inner Volatility folder you should see the python source code files as shown in Figure 10.

Figure 9 and 10: Newly created folder containing Volatility SVN repository.

To test the newly downloaded code, open a command shell, go inside the Volatility folder (which is inside your newly created folder) and type "python volatility" without the quotes. (This is assuming you have already installed Python, which is covered in the installation manual.) See below:

Figure 11: Running Volatility
Now you're set. You have the latest source code for Volatility. Next will be how to install plugins...
Thursday, July 30, 2009
Cygwin Installation
Note: I am reusing a post from my forensics class at John Jay College. This will be used as a reference for an upcoming post on Volatility module installation. So be patient, there is more to come...
This post goes over an installation of Cygwin which is a Linux-like environment for windows. Since most of you have Windows machines, this will allow you run tools that normally run under Linux/Unix environments.
The setup file is here.
When you download setup, double click it. You should see the following:
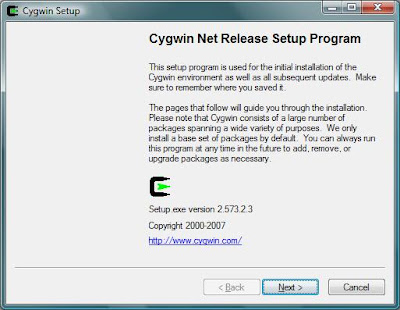
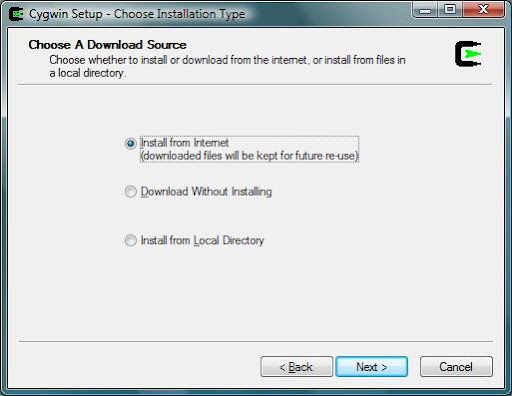
Press ``Next'' and choose ``Install from the Internet'' :
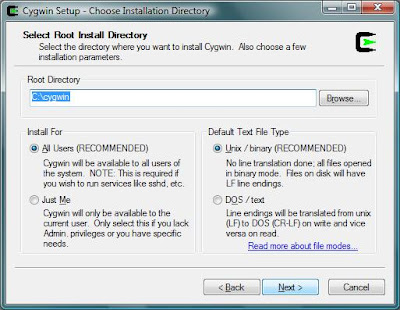
Choose where to install Cygwin (by default it is in C:\Cygwin):
Cygwin will create a directory in which it will store the its files during installation. After installation you can delete the folder. The default location is the desktop:
Select your internet connection. The default is OK:
Select a mirror (mirrorservice.org is good):
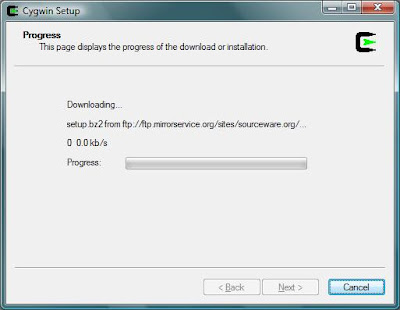
Press ``Next'' You should see the following:
Next you will see a list of packages you can download. By default these are organized by category:
If you press the plus signs on the left hand side, it will open up the category and you can select specific packages:
Here is a list of packages you need organized by category:
After you have made your selections, press next for installation to begin. This part is the actual installation, and may take some time. Just let it finish. After it finishes you will be asked if you want to create shortcuts on the desktop. Make sure to click Finish.
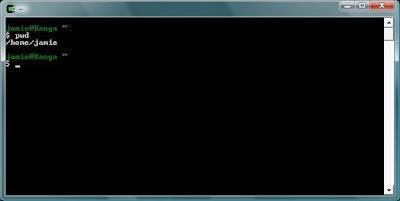
Running Cygwin
When you run Cygwin for the first time, it might take a little longer to start up. This is because it is configuring
a few more files for your environment. Then you should get a command line prompt that looks like:
You are now able to work on your programs at home on your windows machines.
This post goes over an installation of Cygwin which is a Linux-like environment for windows. Since most of you have Windows machines, this will allow you run tools that normally run under Linux/Unix environments.
The setup file is here.
When you download setup, double click it. You should see the following:

Press ``Next'' and choose ``Install from the Internet'' :

Choose where to install Cygwin (by default it is in C:\Cygwin):
 |
Cygwin will create a directory in which it will store the its files during installation. After installation you can delete the folder. The default location is the desktop:
 |
Select your internet connection. The default is OK:
 |
Select a mirror (mirrorservice.org is good):
 |
Press ``Next'' You should see the following:

Next you will see a list of packages you can download. By default these are organized by category:
 |
If you press the plus signs on the left hand side, it will open up the category and you can select specific packages:
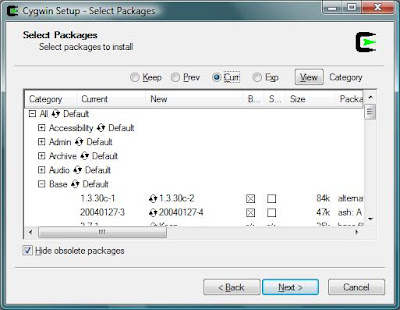 |
Here is a list of packages you need organized by category:
- From the Base category
- Everything
- From the Devel category
- Gcc: C, C++, Fortran compilers
- gcc-mingw: Mingw32 support headers and libraries for GCC
- gcc2: Version X.XX.X [whatever is latest] of C, C++, Fortran compilers
- gdb: The GNU Debugger
- make: The GNU version of the `make' utility
- mingw-runtime: MinGW Runtime
- openssl-devel: The OpenSSL development environment
- From the Editors category
- Nano: A pico clone text editor with extensions [works like pico]
- vim: Vi Improved – enhanced vi editor
- From the Interpreters category
- Perl
- Python
- From the Utils category
- until-linux: Random collection of Linux utilities
- file
- ELFIO
- From the Text category
- less: A file pager program, similar to more(1)
After you have made your selections, press next for installation to begin. This part is the actual installation, and may take some time. Just let it finish. After it finishes you will be asked if you want to create shortcuts on the desktop. Make sure to click Finish.
Running Cygwin
When you run Cygwin for the first time, it might take a little longer to start up. This is because it is configuring
a few more files for your environment. Then you should get a command line prompt that looks like:
You are now able to work on your programs at home on your windows machines.

Thursday, March 05, 2009
PyFlag installation on CentOS 5.2 (updated)
Earlier I wrote about installing Pyflag on Fedora 8. This time, I decided to go for the CentOS install.
First off, this tutorial is not for the faint of heart and as always I take no responsibility if things go wrong on your end.
I got tired of trying to get darcs installed on my CentOS box and instead downloaded the PyFlag tarball. The first thing you will have to do is update Python on your box - I installed 2.6.1 by source.
You must also install all packages mentioned earlier including MySQL for Python and Sleuthkit:
You may have a problem when you install MySQL for Python, however, when it tries to download the setuptools-*.egg file. If you have Python version 2.6 installed you need the following egg file:
setuptools-0.6c9-py2.6.egg.
You can download this into your MySQL-python-1.2.2 directory and change the name to setuptools-0.6c5-py2.6.egg or you can muck around with the ez_setup.py file. However you want to do it.
Now, if you have Python 2.6 installed in addition to your default Python installation, you'll have to copy over some libraries to the new location e.g.
At this point you should be set to begin PyFlag installation.
At that point you are set to run PyFlag. Don't forget to set up MySQL:
You must use quotes around the new-passwd you choose, and don't forget what it is!
Then start PyFlag by typing "pyflag" (without quotes) at the commandline.
By default PyFlag listens on port 8000. So simply open your browser and go to http://127.0.0.1:8000 You can modify settings at this point:
You will then have to initialize the database:
After which you will see a success message:
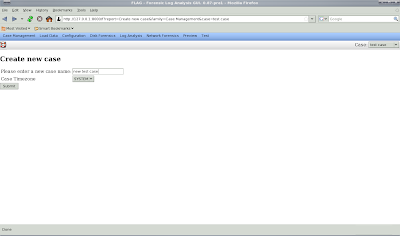
Now you are ready to start a new case, which you can do under case management.

Give the case a name:
and then you will see confirmation that your case is created:
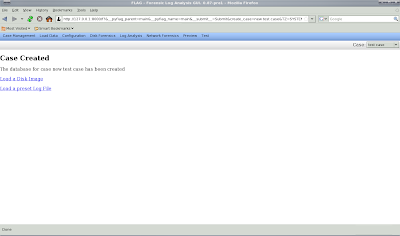
Now you can load your evidence. In this case, I am loading a USB image. Type 0 (zero) for the offset and give your evidence some unique name you'll remember and press submit.
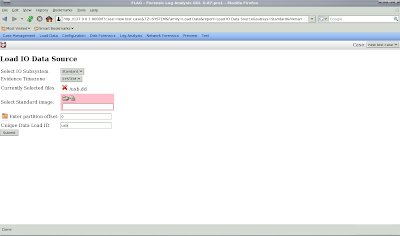
If things work out, you will Sleuthkit will identify the file system type in a mount point (this could be anything, I'm using /usb but it could be D: or whatever):
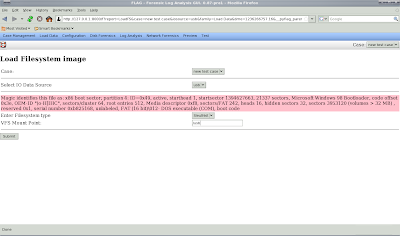
You will then see the uploading dialog.
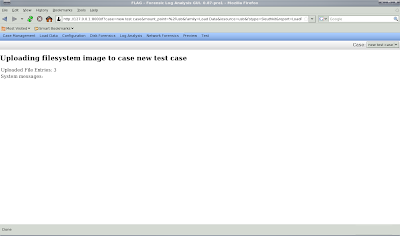
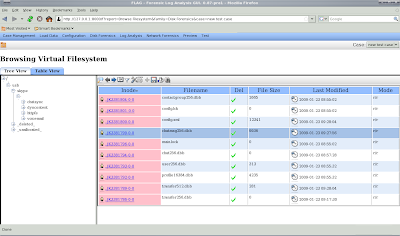
Note: DO NOT BE IMPATIENT! Let it finish uploading. You will notice that it will refresh every now and then as it uploads more from the filesystem. It will then redirect to the analysis screen. You can now browse the filesystem:
First off, this tutorial is not for the faint of heart and as always I take no responsibility if things go wrong on your end.
I got tired of trying to get darcs installed on my CentOS box and instead downloaded the PyFlag tarball. The first thing you will have to do is update Python on your box - I installed 2.6.1 by source.
You must also install all packages mentioned earlier including MySQL for Python and Sleuthkit:
# yum install python-dateutil clamav clamav-server \
mysql mysql-devel mysql-server file-devel python-expect \
zlib zlib-devel openssl python-imaging
You may have a problem when you install MySQL for Python, however, when it tries to download the setuptools-*.egg file. If you have Python version 2.6 installed you need the following egg file:
setuptools-0.6c9-py2.6.egg.
You can download this into your MySQL-python-1.2.2 directory and change the name to setuptools-0.6c5-py2.6.egg or you can muck around with the ez_setup.py file. However you want to do it.
# python2.6 setup.py build
# python2.6 setup.py install
Now, if you have Python 2.6 installed in addition to your default Python installation, you'll have to copy over some libraries to the new location e.g.
# cp -R /usr/lib/python2.4/site-packages/pexpect.py* \
/usr/local/lib/python2.6/site-packages/
# cp -R /usr/lib/python2.4/site-packages/PIL \
/usr/local/lib/python2.6/site-packages/
# cp -R /usr/lib/python2.4/site-packages/python-dateutil \
/usr/local/lib/python2.6/site-packages/
# cp /usr/lib/python2.4/pyexpect.py* \
/usr/local/lib/python2.6/
At this point you should be set to begin PyFlag installation.
# ./configure
# make install
At that point you are set to run PyFlag. Don't forget to set up MySQL:
# /sbin/chkconfig mysqld on
# /sbin/service mysqld start
# mysqladmin -u root password 'new-passwd'
You must use quotes around the new-passwd you choose, and don't forget what it is!
Then start PyFlag by typing "pyflag" (without quotes) at the commandline.
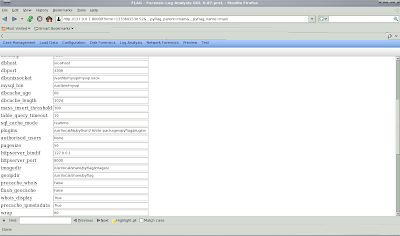
By default PyFlag listens on port 8000. So simply open your browser and go to http://127.0.0.1:8000 You can modify settings at this point:

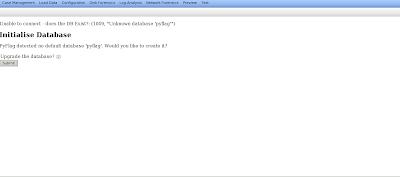
You will then have to initialize the database:

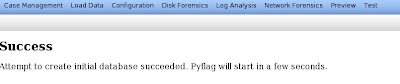
After which you will see a success message:

Now you are ready to start a new case, which you can do under case management.

Give the case a name:

and then you will see confirmation that your case is created:

Now you can load your evidence. In this case, I am loading a USB image. Type 0 (zero) for the offset and give your evidence some unique name you'll remember and press submit.

If things work out, you will Sleuthkit will identify the file system type in a mount point (this could be anything, I'm using /usb but it could be D: or whatever):

You will then see the uploading dialog.

Note: DO NOT BE IMPATIENT! Let it finish uploading. You will notice that it will refresh every now and then as it uploads more from the filesystem. It will then redirect to the analysis screen. You can now browse the filesystem:

Wednesday, February 25, 2009
Briefly: IDA Pro on CentOS 5.2
This is almost a non-post, but who knows, it might be useful to someone... So today I while installing Ida Pro on CentOS, I hit a small snafu. Everything went well for key extraction: here's a nice tutorial for that. However after I retrieved the key, I placed it according to the README file in the $HOME/.idapro directory.
However, when running it I was faced with the following problem:
I noticed that my library was incompatible since it was libstdc++.so.6. Luckily, there are ``compat'' packages that contain these older libraries. You can install them with yum:
At this point, IDA Pro starts up nicely:


However, when running it I was faced with the following problem:
$ ./idal
./idal: error while loading shared libraries: libstdc++.so.5: cannot open shared object file: No such file or directory
I noticed that my library was incompatible since it was libstdc++.so.6. Luckily, there are ``compat'' packages that contain these older libraries. You can install them with yum:
# yum install -y compat-libstdc++-33.i386
At this point, IDA Pro starts up nicely:


Subscribe to:
Posts (Atom)